
How to create a generic automatically generating Slug field for PayloadCMS
When writing content in PayloadCMS, a "slug" field is often necessary for creating user-friendly, SEO-optimized URLs. In this guide, I'll walk through creating a generic slug field implementation, using reusable components to keep your codebase clean and scalable. While this implementation is not perfect, it is a perfect start to learn how to create advanced fields in Payload.
Note: This is developed in Payload 3.0, as payload is still being actively developed changes to Payload may cause this to no longer work.
Overview of the Implementation
- A generic
slugFieldfunction: This function defines the schema for the slug field and integrates validation and the admin interface configuration, you can reuse this field anywhere you want. - A
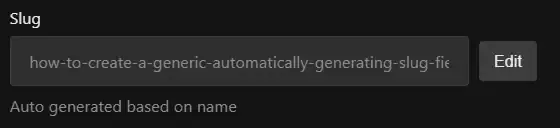
SlugInputReact component: This component provides an admin UI for the slug field, auto-generating the slug based on a tracking field (e.g., a title).
Here's how it looks

Step 1: Define the Slug Field Schema (slug.ts)
Here's how to define a reusable slug field using PayloadCMS.
- We are using the
deepMergefunction from payload to ensure we can override any rules we want to later on. - We are adding a custom component in the admin key linked to the
slug.tsxfile, run thepayload:importmapnpm script after adding this and you'll see the component being added there, this may require some fiddling with the path to get it correctly working. - The
clientpropsobject passes ourtrackingfieldto the component which allows us to use it later on. - We validate the output with a regex, which will only allow characters, numbers and dashes.
import { deepMerge, type Field } from 'payload';

type Slug = (options?: { trackingField?: string }, overrides?: Partial<Field>) => Field;

const slugField: Slug = ({ trackingField = 'title' } = {}, overrides = {}) =>
  deepMerge(
    {
      label: 'Slug',
      name: 'slug',
      type: 'text',
      unique: true,
      index: true,
      required: true,
      admin: {
        position: 'sidebar',
        components: {
          Field: {
            path: 'slug.tsx',
            exportName: 'SlugInput',
            clientProps: {
              trackingField,
            },
          },
        },
      },
      validate: (value: string) => {
        const slugRegex = /^[a-z0-9]+(?:-[a-z0-9]+)*$/;

        if (slugRegex.test(value)) {
          return true;
        }

        return 'Invalid slug. Must be kebab-case (lowercase, words separated by hyphens)';
      },
    },
    overrides,
  );

export { slugField };
Key Features of slugField
- Customization: The
trackingFieldoption allows you to specify which field (e.g.,title) the slug is derived from. - Validation: Ensures the slug is in kebab-case format.
Step 2: Create the Slug Input Component (slug.tsx)
The SlugInput component provides the user interface for managing the slug field. It automatically generates a slug based on the tracking field but allows manual overrides.
- We use the
useFieldhook from payload to ensure the component is connected. - In the
useEffecthook, we examine several potential code paths that could disrupt the component, and we also utilize thetoKebabCasefunction exported from Payload to ensure the slug is in kebab-case.
'use client';

import React, { type ChangeEvent, type ReactElement, useEffect, useRef } from 'react';
import { TextInput, useField } from '@payloadcms/ui';
import { toKebabCase } from 'payload/shared';

export interface SlugInputProps {
  trackingField: string;
}

function SlugInput(props: SlugInputProps): ReactElement {
  const { trackingField } = props;

  const { value: slugValue = '', setValue: setSlugValue } = useField<string>({
    path: 'slug',
  });

  const { value: trackingFieldValue } = useField<string>({
    path: trackingField,
  });

  const prevTrackingFieldValueRef = useRef(trackingFieldValue);
  const stopTrackingRef = useRef(false);

  useEffect(() => {
    if (!trackingField || stopTrackingRef.current) {
      return;
    }
    if (trackingFieldValue === prevTrackingFieldValueRef.current) {
      return;
    }
    const prevSlugValue = toKebabCase(prevTrackingFieldValueRef.current || '') as string;

    prevTrackingFieldValueRef.current = trackingFieldValue;
    if (prevSlugValue !== slugValue) {
      return;
    }
    setSlugValue(toKebabCase(trackingFieldValue));
  }, [setSlugValue, slugValue, trackingField, trackingFieldValue]);

  return (
    <div>
      <TextInput
        path="slug"
        label="Slug"
        readOnly
        description={
          slugValue
            ? `Auto generated based on ${trackingField}`
            : `Will be auto-generated from ${trackingField} when saved`
        }
        value={slugValue}
        onChange={(e: ChangeEvent<HTMLInputElement>) => {
          setSlugValue(e.target.value);
          stopTrackingRef.current = true;
        }}
      />
    </div>
  );
}

export { SlugInput };
Key Features of SlugInput
- Auto-Generation: Listens to the tracking field and auto-generates the slug in real time.
- Read-only: Personally I don't need to change the slug, so I've marked my input as Read-only, if you do wish to change slugs after generating, simply remove this attribute.
- Real-Time Updates: Updates the slug only when the tracking field changes.
Step 3: Use the Slug Field in Your Collections
To add the slug field to a collection, use the `slugField` function in the schema definition:
import { CollectionConfig } from 'payload/types';
import { slugField } from './fields/slug';

const Posts: CollectionConfig = {
  slug: 'posts',
  fields: [
    {
      name: 'title',
      type: 'text',
      required: true,
    },
    slugField({ trackingField: 'title' }),
  ],
};

export default Posts;
Additional improvements you can make.
Since this is a simple React component, you can imagine that this pattern can be applied in various ways, not just to create a slug field. But for now, let's focus on improving this component.
For instance, we can enhance this component by allowing content editors to optionally edit the field if they wish.
// All other code has been removed to reduce reading load.
function SlugInput(props: SlugInputProps): ReactElement {
    const [isEditable, setIsEditable] = useState(false)

    return (
      <TextInput
        readOnly={!isEditable}
      />
      <Button
        buttonStyle="pill"
        onClick={() => {
          setIsEditable(!isEditable)
        }}
      >
        {isEditable ? 'Cancel' : 'Edit'}
      </Button>
  )
}
Conclusion
By combining a reusable slugField function with a custom SlugInput component, you can streamline slug management in PayloadCMS. This implementation ensures a clean, consistent user experience while keeping your codebase modular and maintainable.
